I’ll show you achievable faux metal paint techniques with just a few colors of paint. My tutorial below will work on just about anything. I just happened to be painting a letter today. I’m using this this fun paper mache letter, it’s just over 2 feet tall. I gave it a cool faux metal appearance with paint in about 30 minutes.
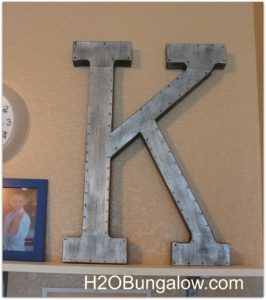
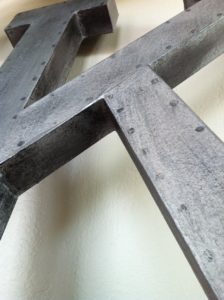
This ginormous letter, by the way, is for my nephew’s bedroom he recently turned 11 and is now officially a “tween”. His gift from my family was a total bedroom redo which you’ll be seeing more of very soon. Here’s what it looks like finished. It really looks like metal. Pretty cool huh?
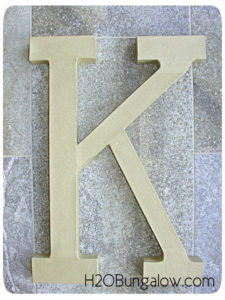
This is what it looked like before painting.
It’s super easy to make and this faux metal finish looks good on lots of things. Ready? Awesome.. so here are my faux metal paint techniques you can use on practically anything!
I use affiliate links to help you find the products I used. If you make a purchase I get a small commission at no cost to you. The affiliate money I earn helps cover the overhead costs of H2OBungalow. Thank you for your support!
Here’s a list of what you’ll need to follow my faux metal paint technique.
- spray paint primer
- Metallic silver paint
- Black craft paint
- Spray clear coat for sealer
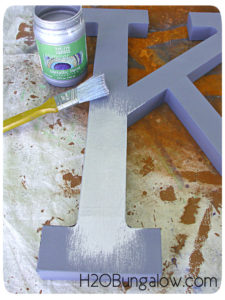
Step one: Start by priming with 2 coats of a spray primer. I liked the spray for this because it doesn’t get the paper mache too wet. If it gets too wet it may start coming apart, so spray several light coats and let it dry in between. You’re just looking to seal the surface. When it’s dry, give it a good coat of a metallic paint. I have an awesome silver paint from Glidden but its expensive, about $30 a qt. The craft stores have good silver metallic paints that will work just fine.
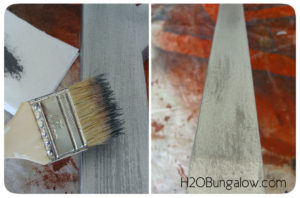
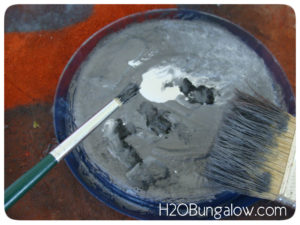
Here’s the fun part..Put multiple layers of a mixture of the metallic paint mixed with black paint in varying amounts using a dry brush technique. Have fun with this, you cannot ruin it. The trick to this is simply layers..just have lots of layers with some blended together more than others. The dry brush technique is simply dabbing the tip of the paint brush into the paint and then dabbing it onto a towel until most of the paint is off. Your brush will seem almost dry and only a small amount of paint will show up on the surface you are painting.
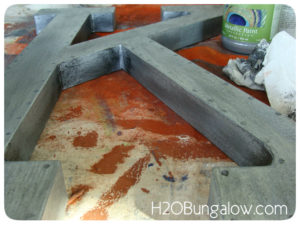
Next you’re going to add black detail on the sides emphasizing the corners and nooks where you’d like the shadows to be enhanced. You’ll still be using the dry brush technique, just with more paint on the brush. Grab a paper towel to help with the blending if you need to.
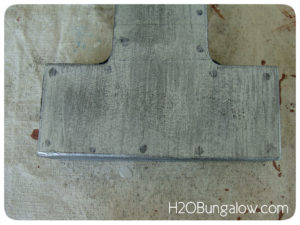
Make rivets by spinning circles with a small brush around the edges, add another layer of detail by adding a small amount of black edge to each rivet. Last if you want to add just a little more depth or tone down the metallic look make a wash with the black paint and add it in some areas, wipe off gently with a soft cloth or paper towel.
When dry give it a nice coat with thin layers of a clear sealer..
You’ll have a pretty nice piece you can use yourself or give as a gift. These look good almost anywhere you use them and they’re really inexpensive (about $6 or $7) if you catch them on sale or use a Michael’s coupon 🙂
Are you ready to use these faux metal paint techniques now? Who do you know that could use a big letter? How about one for yourself?

Mila says
Hi Wendy, thanks heaps for sharing what seems to be a very easy technique to try as being so affordable and fun. I have never attempted anything like this but willing to give it a go. I would love, after some praticing, to give the front door of my house a brushed metal look and was wondering if this would work? should I use any sealer to protect the finish from weather?
Thanks again for sharing.
Wendi says
Hi Mila, You are welcome and I’m so glad you found my faux finish tutorial helpful. Yes, I think this would work on your front door. Funny thing, because I aged my front door with a faux copper finish! Here’s the link. I’d follow the instructions for this technique and see if I have any good pointers on refinishing the door from the other post. It’s been a while since I redid the door. Also, to answer your questions. If your front door is exposed to sunlight and the elements, I’d use outdoor rated paint as well as as UV protectant outdoor rated sealer Good luck and have fun!
Katie Breland says
Hi. What color primer did you use? Also can I use metallic spray paint?
Wendi says
Hi Katie, I used a grey primer as a base. I’m sure you could use a metal spray paint too:) If you wanted to add variation and depth to the finish just follow the rest of the steps to layer over the metallic paint. That sounds like a great combination! Thanks so much for your visit!
Cindy says
Hi Wendi. Thank you so much for the tutorial. Really. So many people are not willing to share the techniques so they can gain monetarily. Don`t get me wrong, I am all for earning a living doing what you love. But also very grateful for the knowledge you share. The faux metal is beautiful. I will definitely be using the technique. Again, thank you. Cindy
Wendi says
Hi Cindy, So glad you liked and found the tutorial useful. I’ve used it on several different projects and it always turns out well. TThanks so much for your nice note and your visit! Please come back again:)
Joan Maurer says
This does look easy to do and the supplies needed easy to obtain. I do not need letters, but I do need a large bathroom mirror with a “metal” frame. If this works out it will save me $$$$$. Plus I need projects to occupy myself. I just love telling people ” I did it myself”.
Wendi says
Hi Joan! This process would be perfect for a mirror. I used it for my husband’s dresser top, which sounds crazy but it looks fabulous. I think sharing that you made something that looks good in the house is at least half the fun of doing the project! Have fun and thanks for your visit!
Pauline Molinari says
This looks fantastic! Thanks for sharing your crafty inspiration on this week’s Monday Funday Party!
Wendi says
Thank you Pauline. I love painting this finish, it’s one of my all time favorites:) Thanks for your visit!
Rose Garden Malevik says
Hi Wendi
that is a really great job 🙂
You are welcome to join
SATURDAY SHOW OFF BlogParty
Hugs from Håkan in Sweden
Wendi says
Hi & thank you so much. This is one of my favorite finishes to do. I’ve used it on metal, furniture…everything! I will do my best to stop by your party:) Have a great weekend and thanks so much for leaving a comment:)
Wendi says
Thank you Rose! It’s one of my favorite finishes to make. Thanks for stopping by & I’ll do my best to visit your party!
sharon wheet says
thank you so much for the tutorial! awesome job. great explanation. and wonderful inspiration!
Wendi says
Sharon, You’re welcome! I’m glad it ws helpful. This is such useful finish on all kinds of projects:) Thanks for your note & stopping by!
Thomas says
When you say “craft paint” what kind of paint do you mean? There are tons of types of craft paint
Wendi says
Thomas, So sorry if that wasn’t clear. I like the small bottles of paint like DecoArt, Americana brands. There are usually several brands like this in the same sectiona and typically cost less than $1 ea. Hope that helps and happy crafting!
Thomas says
So acrylic?
Wendi says
Yes, acrylic paint works fine to get the metal appearance. Good luck on your project!
Krista @ the happy housie says
I really love this Wendi! I am pinning it and would love to make some of these for my boys’ bedroom (our next big project). Thanks for the tutorial!! Great to meet you through the giveaway: Have a great weekend!
~Krista
Wendi says
Krista. These are a big hit with kids. My tween nephew loved his. I’ve no doubt you’ll do something awesome with it for your kids. It’s so very nice to meet you through the giveaway as well. I’m an admirer of your work and blog. Thank you for stopping by!
katie says
Wendi–I love faux metal finish! Thanks for linking up last month–I featured this on Sew Woodsy!
Marie@InteriorFrugalista says
Hi Wendi! I’m loving your faux metal letter – so cool. Great tutorial too, I found it over at the Spread The Love Linky Party.
Wendi says
Thank you Marie! I love paint.. it’s my favorite medium! Rebecca does great & I’ve been having fun with her linky Party too.
Wendi says
Thank you.. I think so too! It works well for all ages. I want to do a whole word next, Like BEACH or LOVE LIFE.. Stay tuned I just might. Thanks for stopping over & hosting such a great link-up party!
Rebecca @ Love at First Book says
Genius!!!! I love this idea! It takes the monogram and makes it a little trendier!
Krystina @ By the Seat of my Shorts says
I’ve been wanting to do something like this- I wanted the look of the big industrial letter without the cost. But every tutorial I’ve come across really does look like a DIY alternative… This one is fantastic! When I read that the rivets were just simple brush swirls, I had to go back and look at the pictures again. Seriously- this looks great!! I love to DIY but I hate when a project comes out kitschy. First time here from CFL DIY Bloggers and I’m so excited to snoop around some more. 🙂
*Krystina
Wendi says
Yeah!! What an awesome comment! The metal look really is that easy. You can do this! Thanks for stopping by & welcome to the CFL DIY Blogger group!
Tammy Killough says
I love this. You did a great job with your faux paint! Thanks for sharing! ~Tammy
Wendi says
You’re welcome. I love how it’s so easy to do. Thanks for stopping by & leaving me a note XXOO
Jami @ An Oregon Cottage says
I’ve seen a lot of these tutorials for metallic finish, but yours seems to be the most user-friendly using products that are easy to find. Thanks so much! (I found you on HT, btw!)
Wendi says
Wow, Thank you.. you made my day! I love this finish it’s so easy. I’ve fooled people who really thought that letter was metal 🙂
Cat says
do you dry the paint between the layers?
Wendi says
Hi Cat, the layers are really thin so the paint dried quickly in between layers before I needed to go back to you. The short answer is yes:) Thanks so much for your visit!