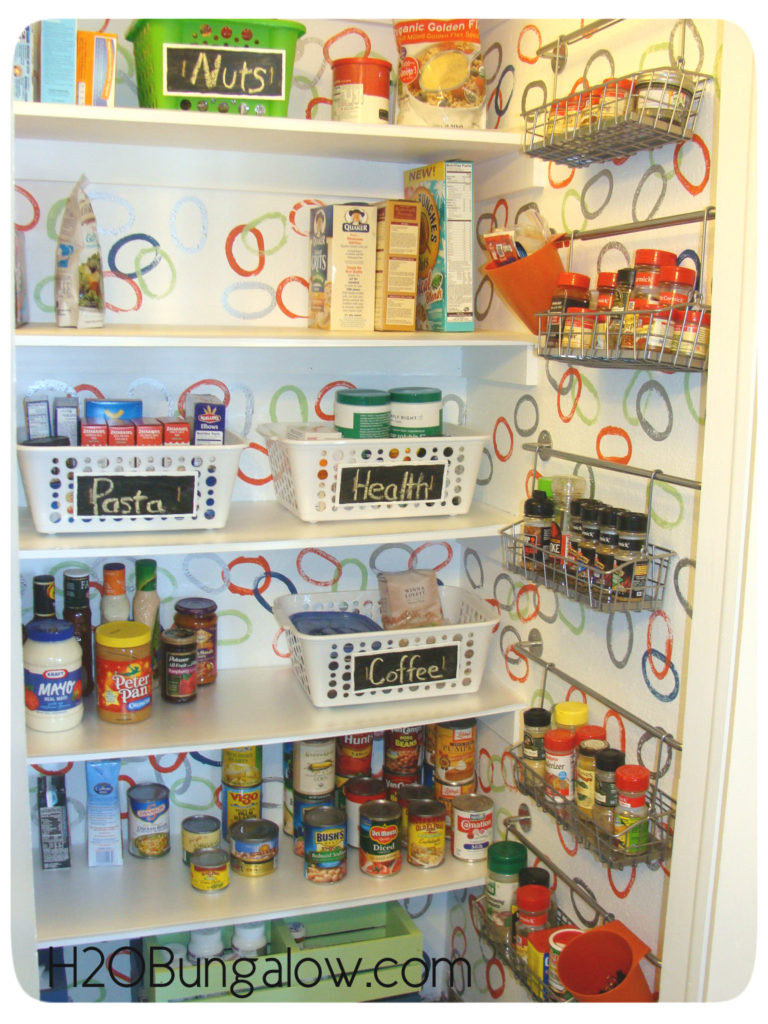
The storage containers I made for the Pantry Makeover were easy and inexpensive. The pantry has been done for a few weeks and I’m surprised by the difference these items have made in organization, clutter control and even time savings.This makeover boiled down to only four key items. Plenty of baskets, a few custom wooden crates, a nifty place to keep all my spices and a few bins with lids.
First and the most simple was to add plenty of labeled baskets for the shelves, yup good ole Dollar Store variety. Easy peasy. It takes only a few moments to look in the baskets and see what I need before running to the market. Now, I don’t end up with 5 bottles of ketchup or some other random item.
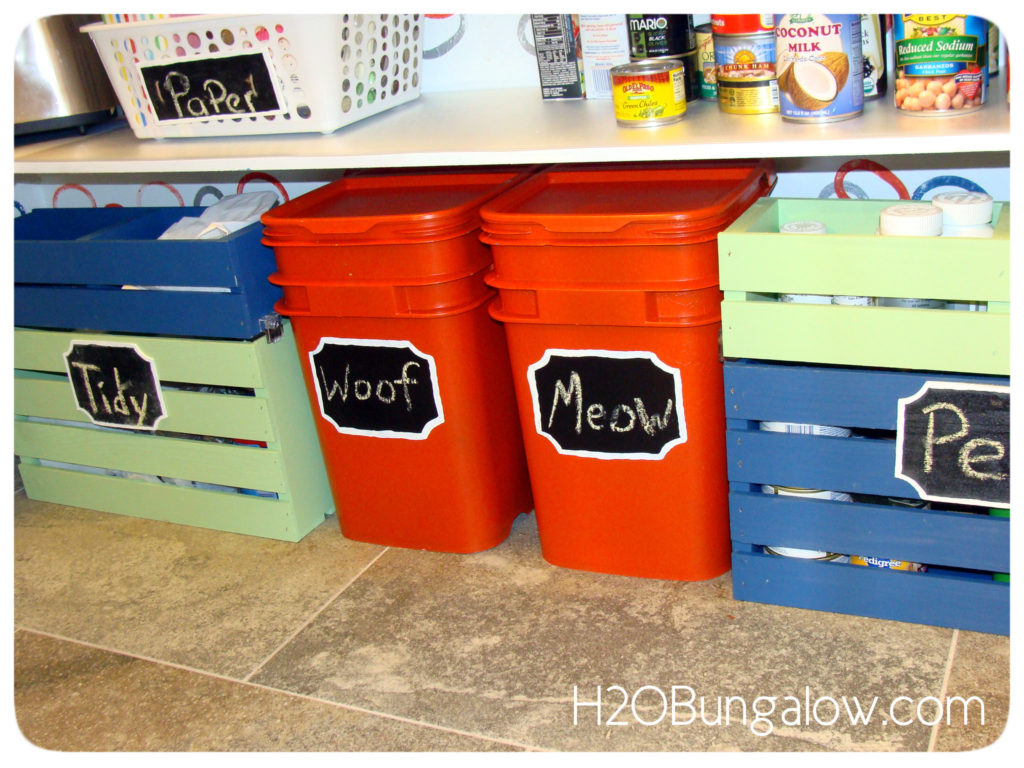
Second I made use of the space on the floor under the lowest shelf. I made pet food containers, one open crate and a few stacked two-tiered crates. Boy, these really hold lots of stuff. Our furry kitty friends Sam and Dexter as well as our boxer dog Cinnamon have lots of necessities like cans of food, dinner bowls, treats and pet meds. I needed a way to hide the clutter and keep access convenient.
The stacked crates are my favorite. They are super sturdy and will last with lots of daily use. I will definitely make more of these for other closets in our house. I’m in love with the convenience. They were easy to make too.
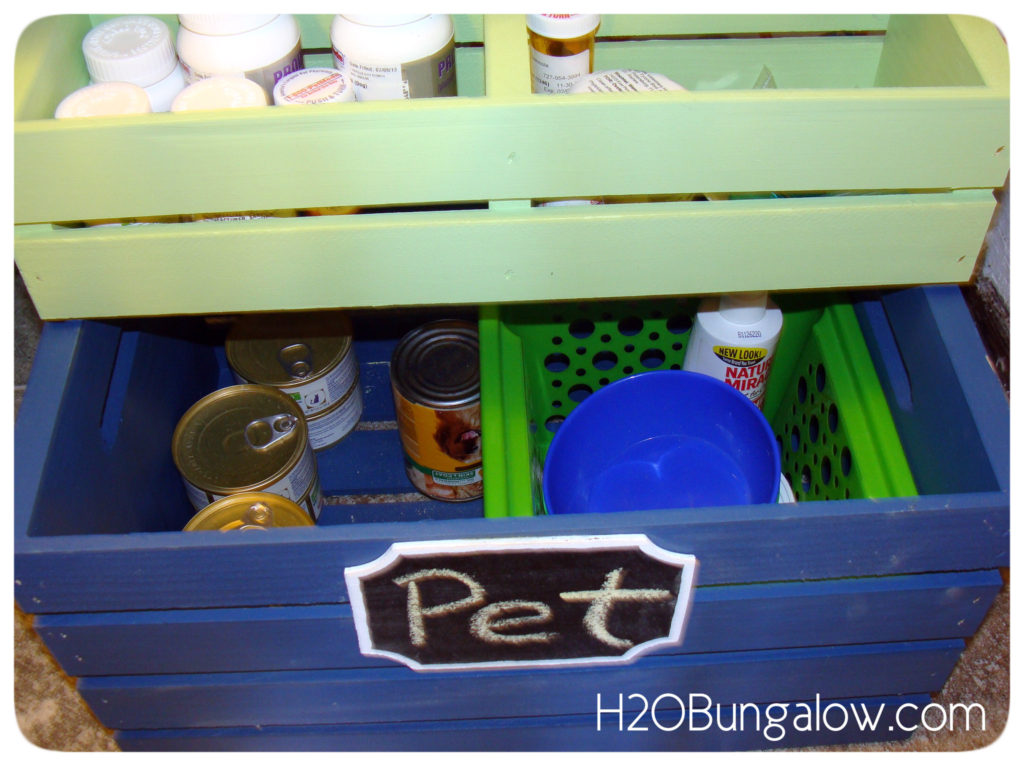
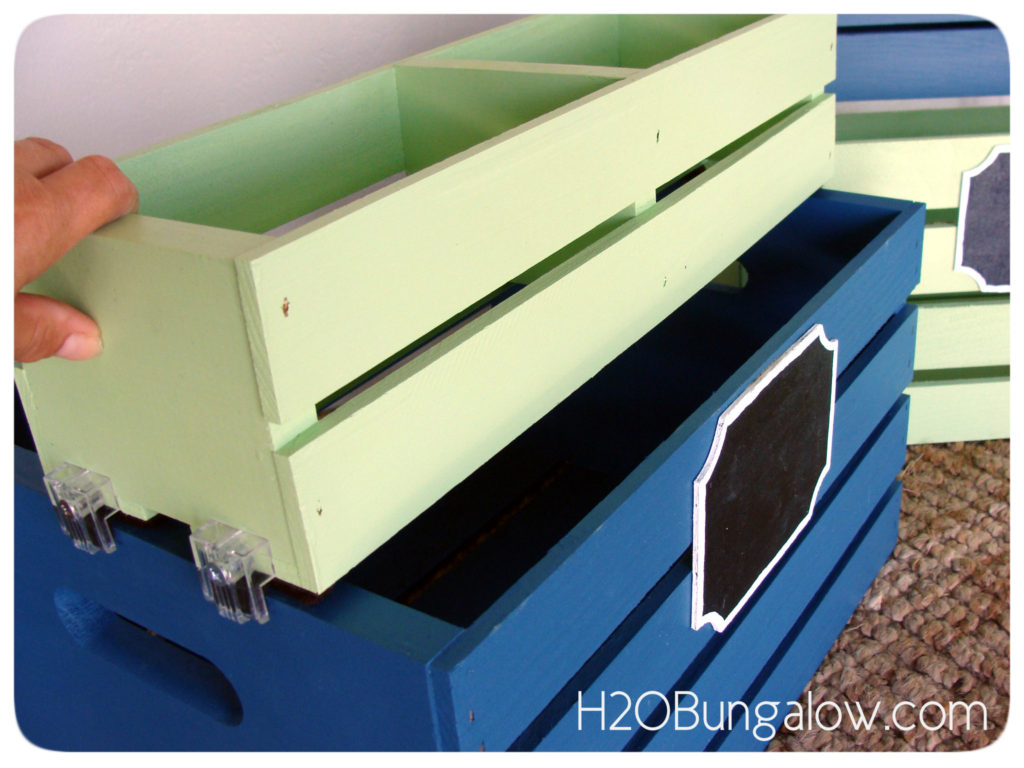
Custom storage crate has top that slides back for more storage
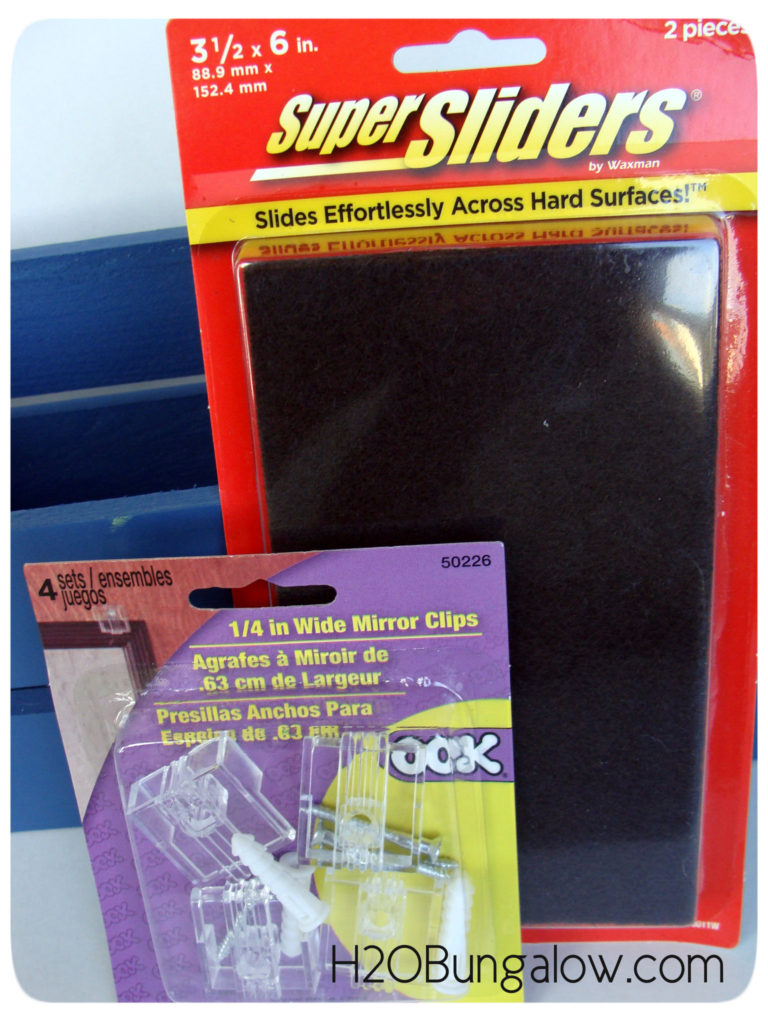
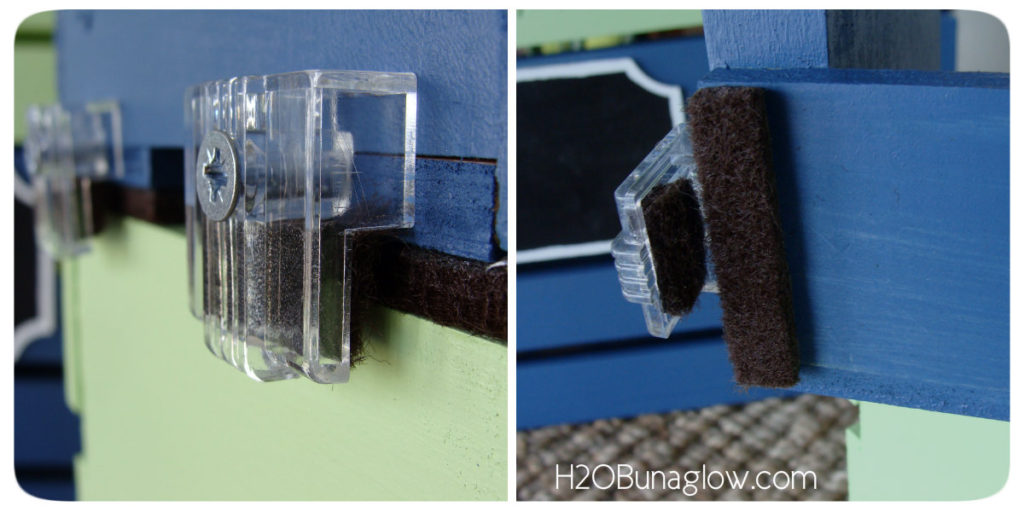
I made these with unfinished wood crates from JoAnn’s Fabric. The bottom is the large size and the top is the two section cd holder. Stacked they are the perfect fit for under my lowest shelf. I painted them with the leftover paint from the pantry makeover. I wanted the top to slide to slide back to reveal the contents of the lower bin and not fall in or off the bottom crate. I also needed to protect the paint from the sliding action of daily use. If I’m putting this much time into something I want it to stay nice looking, right? After browsing the hardware section at Home Depot I picked up a package of Super Sliders and some mirror clips. They did the trick!
I attached the mirror clips two to each side of the top cd crate. These keep the top in place and allow it to slide back and forth but not from side to side or fall off. I did change the screws they came with to a smaller screw. Pre-drill a small hole so you don’t need to worry about the wood splitting. It took less than 5 minutes to attach these. ~ Super easy 🙂 Next cut the Super Sliders to fit a strip at the base of the cd crate and a smaller one to fit in the recess of the mirror clip (picture below on left). It comes with a sticky backing so all you have to do is peel and place where you want it.
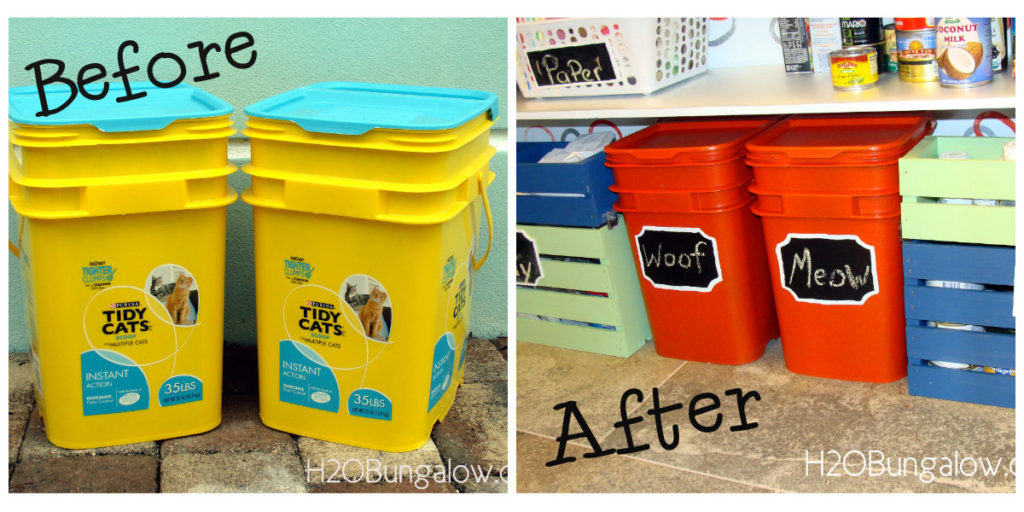
For the pet food containers I up-cycled plastic kitty litter containers we had. They’re heavy and sturdy and I’ve been wanting to find a use for these things for the longest time. I always feel so guilty when I throw them into the recycle bin.They are working out really well. The cats can’t open them and the food stays fresh. The crazy thing is I bought some other pet food storage containers that were too tall to fit where I needed them and took up a large amount of space in the pantry. I’ve looked for months for new ones. We had these containers all along!
I used a spray paint primer and then painted them with a made for plastic spray paint. I only painted the outside so paint wouldn’t touch the pet food. The labels were traced and then painted on. Speaking of labels…the rest of the labels are wood and from Michael’s. They all got a few coats of chalkboard paint and I edged them with a bit of white. I attached the basket labels with jute string after drilling two holes on each side of the plaque. The crate labels were glued on with a bit of wood glue. I like that the floor crates and pet food containers have the same label shape. It added a little touch of balance.
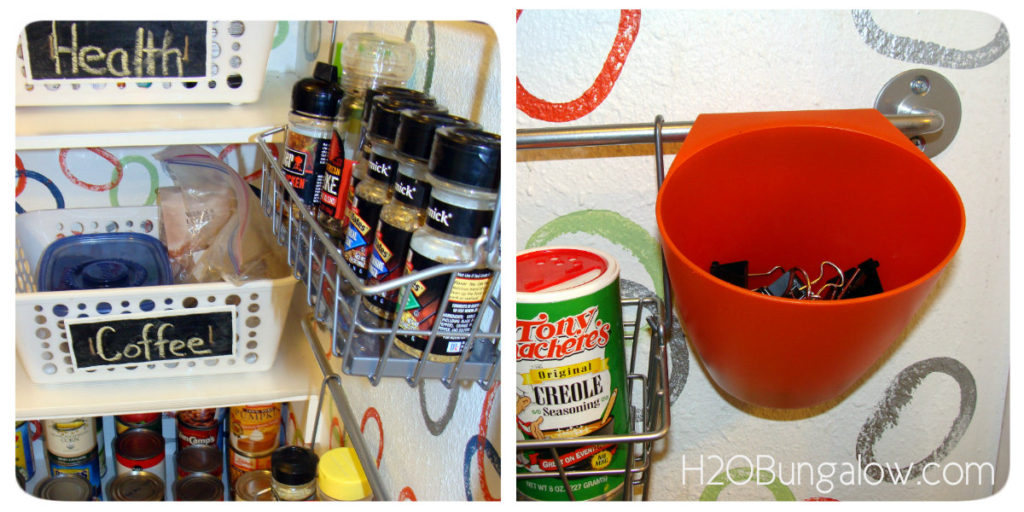
On to the spice racks. If you read my desk makeover you already know I really LOVE these hanging rails. I found them at Ikea. They come in several styles and they have baskets, buckets and lots of other neat things to hang from them. I added a few of the Ikea hanging cups and gave them a quick makeover with the spray paint. Just last week I found cute colorful buckets at the dollar store which will fit on these too. Just use “S” hooks.
This is my other big favorite in the makeover. Something so very simple as this made a humongous difference in shelf space used. The spices stay in their place too. No more trying to find one spice in the back of the cabinet, no more not knowing when I’m low on something…or buying more of something when I already have it. You know what I mean, don’t you? Most importantly, I use more, have more fun and make better dishes because I see and use what I have. That wall was wasted space, which in my compact home is just not allowed!.
By adding these four simple items into my pantry I’ve increased my space, got rid of clutter and found an easy way to maintain the organization. I’m thinking of adapting this to my closet in the main bathroom. Where could you use some of these ideas in your home?
I’m publishing this post from Dallas where I’m having some very special daughter time and of course some grand baby time! While he’s napping I’m getting this done 🙂 I’ll post again next week and take the rest of the week off to enjoy my time with family. Stay tuned though because next week I’ll share a very special project that my oldest daughter and I have been working on together while I’ve been here this week.
Want more organization tips. Check out my best organization tips for busy people.

Eva says
Love your crate idea. Muat use it when I redo my pantry. Only one problem I see is the “wallpaper” makes it look so busy. Almost hard to see what you have. Do love the Ikea rails. Good job!
Wendi says
I’m glad you liked my rail idea for spices. They do stay organized and always visible when I need to find one. Thanks so much for your visit and taking the time to leave a note.
Val says
Wow Wendy, lots of great tips here! I love your “Woof” & “Meow” pet food containers. Makes me glad I (hoard) save buckets! Have a great day!
Val
Wendi says
Val, I hate throwing those buckets away! I feel so wasteful when I do. They’ve held up well as pet food containers and that helps me keep my pantry organized and tidy 🙂 Plus it saves me a trip to the garage for the pet food.. I’m sure you’ll find a fun way to paint some yourself!
Wendi says
Thanks Sharon! They are such sturdy containers and I hated not reusing them. A good primer is all it took to stick on the plastic. Thanks for visiting my corner of Bloggyland!
Sharon @ Life After Empty Nest says
Looks fantastic Wendi! I love the pet containers from recycled tidy cat containers! So cool how you can paint plastic ! Awesome job! xoxo
Wendi says
Hi Kimberly ~ I’ve really enjoyed the Throwback Thursday link up! Thanks for stopping by!
Kimberly @ Colors Mixed Together says
Very nice! Thanks so much for linking it up to Throwback Thursday!
Kim
Sharon says
This is so neat! I need to redo my pantry so bad. Things are always in the way of whatever I’m looking for. Organization in the kitchen is always something I need to work on. Keeping this in mind, for sure.
Wendi says
This has helped us stay much more organized. Our Pantry never stayed neat before. 🙂 Try it… and send me pictures if you do!
Katherines Corner says
Wendi these are terrific tips!!! Thank you for sharing the hop with your readers too.
Thank you for sharing at the Thursday Favorite Things hop. Big Hugs and Happy Monday!
Wendi says
You’re welcome and thank you for stopping by today. I enjoyed your hop and looking forward to doing it again!